Showing posts with label dotticure. Show all posts

Wednesday, November 27, 2013

OPI Liquid Sand Nail Art...and Giving Thanks!

Hello my little turkeys....yes I have Thanksgiving on the brain! I am waking up at 5 and shoving a big ass bird into my oven. Just another day at the YWP compound!

So I sat down to do my nails and surprisingly I was in the mood for sparkles....but dark sparkles. I was a bit perplexed until I remembered one little beauty of mine that would work perfectly!

 To create this hot mama, I used Essie Glamour Purse as a base on every nail except my ring finger. This beauty is quickly nudging Mink Muffs out of the #1 spot of my most loved brown polish. I was never one for murky browns but for some reason we now are best friends and even wearing matching outfits....can you say twinning?

I then pulled out the star of the show....OPI What Wizardry is This? and got down to bid-nass! I taped off my index and pinky nails with striping tape and applied one thin layer of WWIT. My middle finger was happy to sport some simple dots and we left it at that! I loved this color so much that I had to put it on my ring finger all by itself. Sometimes polishes are so gorgeous that they should be left untouched and this baby beater is one of those shades. I cannot wait to do a full mani with just this color.

So you're probably thinking....um excuse me woman but why is your Liquid Sand polish not liquid sandy at all? I couldn't resist...I had to pull out the Seche Vite and gloss everything up! I do like this one as a textured polish but tonight I was craving sparkles (which is rare so I had to ride that train as far as I could) and I knew top coating her would result in glittery brown goodness.


Can you even stand how beautiful this polish is? I do feel a bit bad showing this hot mama off considering it was in a collection that was out quite a while ago...Oz The Great and Powerful to be exact. Buuuuuut....I checked online and this is readily available on Amazon and Ebay so if you need a fix a fix you shall have!

I haven't used too many textured polishes but out of the ones I have tried, this sexpot has the best formula by far of any of them!! This polish basically applies itself! If you love textured polishes, WWIT is a must have! Put down the turkey leg and get to shopping!

For all of my American peeps, have a kick ass Thanksgiving!! This year I am thankful for 3 healthy children who keep me stepping and a husband who adores me! I also am incredibly thankful for all of you. As cliche as it sounds, I can't imagine my life without all of you and I thank God everyday for the success I am having in the beauty world and the loyal people who come with it!! I tell you guys all the time how much I love you and I honestly do! Thank you from the bottom of my heart for all of the inspiration, encouragement and friendship that you have all brought into my life! I'm thoroughly enjoying every second of the roller coaster ride that is Young Wild and Polished!!

Phew, this was a long one....lol that's what she said....sorry....couldn't resist.

Happy Polishing dolls!!

Monday, November 25, 2013

Everything but the Kitchen Sink Nail Art...

Hello my kittens, can you believe 2 posts in 2 days....am I running a fever or what?? Nope, just addicted to my new laptop...I swear I could post 10 blogs a day just so I could play on Maxine (yes she has a name....address her correctly or face the consequences)!

For some reason I find myself reserving my blog for nail art and my YouTube channel seems to be mostly about makeup (with a bit of polish thrown in). This is just how my pin sized brain works....I really need to merge the 2....can I make a New Year's resolution in November? Tomorrow's video is going to be my November favorites so I think it would be the perfect time to get these 2 working together....stay tuned to see me try to get my shit together!

Alright, enough talky talky, let's get to the naily naily...oh Lord that was cheese ball even for me!

So this is what happens when I can't make up my mind about nail art....


A little kitchen sink mani for my friends....if you aren't familiar with the term, allow me to explain! A kitchen sink mani is basically a name I came up with for nail art that includes everything but the dang kitchen sink. It's my most favorite kind of nail art to do....for one, I can never make up my mind, and two, I love the chaos that is a KSM.

For this lovely lady we have some stripes done with (of course) striping tape, a little splatter, glitter and dots, because every good KSM includes dots!!

On my index finger, I started with a base of Essie Blanc, topped that with Seche Vite and once it was dry, I laid down striping tape and finished off with Nails Inc. Black Taxi. I will link my striping tape tutorial at the end for those of you interested.

My ring finger is a splatter mani, the easiest type of nail art to do! I used Nails Inc. Baker St, Essie Mojito Madness and Nails Inc. Black Taxi. 

On my thumb I dotted some hella large dots on a black base using Sinful Colors Sail la Vie. 

OPI Crown Me Already on my pinky and Essie She's Pampered on my middle finger complete this chaotic little sugar bomb.

What do you guys think about KSM? Do you love em as much as I do? If you guys try this design please tag me on Twitter or Instagram using the hashtag #youngwildandpolished (as always).

Love you guys....hope you're all having a mama slapping good day! Punch a baby for me....just for good measure! We gotta keep those crying infants in check yo!

Happy Polishing my YWPeeps!!


Wednesday, July 31, 2013

Pastel Dotticure.....and a blog update!

Have I mentioned that I hate technology? Our internet has been out for um, about 10 days and I'm going quite insane!  Luckily I can set up a hotspot (foxy brown reference anyone? Am I alone in this?) but it sucks up all my data....that's alright though, it's worth it for you all!

Anywhoo's, I've missed you guys!  But I'm here now, so less talky and more naily naily!

I did this little dotticure a few days ago, and absolutely looooved how it turned out!  Check it out and tell me what you guys think!


Mmmmmm hmmmmm, pertty right?  I used Julie G Gelato, Essie Tart Deco and Essie East Hampton Cottage (ring finger base).  I love how the colors just work so well together!

If you guys haven't tried Julie G polishes you must! It's an order!  The formula is amazing and there are some pretty sweet colors to choose from!  I probably own about 30 of them and love em all!  

You guys already know how I feel about Essie so I won't even go there! Perfection as usual, although I must say, East Hampton Cottage is really sheer.  I had to do 4 coats to get it just right, but it was worth it!  So pearly and gorgeous!

If you're looking for a tutorial on the nail art, you've come to the right place! Do I or do I not sound like a car salesman? Click it, click it right now! 

Hope you guys enjoyed my little pastel princess!  My next post will be all about the new Milani line that is out (which I lurve) and then after that I am dipping my blogging toes into some makeup fun!  I said before I wanted to venture into actual "beauty" blogging and not just nails, and the time has come to finally get it going!  It only makes sense, if you guys watch me on Youtube you know that I love makeup just as much as polish.  Hi I'm Nicole and I'm addicted to all things girly! 

I'm going to try to kind of tie my posts in with my Youtube channel.  If I do a video on concealer, I'll follow it up with a blog post to go along with it.  I think it will make my blog a lot more "necessary" if that makes sense and it's something I've been wanting to do!  Don't worry though, there will still be a ton of nail art, that is something that will never change!

Hopefully my internet issues will be resolved soon.  Either that or I have to hit the lottery to fund my hotspot necessities!

Love you guys!!

Happy Polishing!!

Wednesday, July 10, 2013

Essie Watermelon Nail Art.....Kinda Sorta?!

Hi kiddos, I'm sorry I've been MIA for a few days, I have been sick as a dog!  I finally went to the dr and (just as I suspected) I have strep throat and a really killer cold.  So I've been resting and trying to get better.  My poor nails have been bare for 2 days....I couldn't take it any longer so I composed myself and got crackin, bunny slippers, robe and all!

The nail art I did kind of turned out a bit like watermelon nails, even though that wasn't what I had in mind...


I know this pic is a bit off center....I'm blaming the cold medicine!

Watermelon-licious?  I didn't even realize it until a few of you on Instagram commented.  This is probably one of my favorite mani's I've done in 2013!  I just love how the pink polka dotted nails resemble ladybugs but also remind me of watermelon.....either way it's something summery!  And I think the green plays really well with the pink...ohhhh I just really like it all! Not to toot my own horn or anything (toot) but I do think this turned out pretty derrrn cute!

I used all Essie's. You're shocked you say?  Wake up and smell the crazy, I'm addicted to Essie polish and ain't nothin gon' change that, ya hear?  They just work so well together and are perfect for doing nail art!

The beautiful bright green shade is The More the Merrier, the fun pink is Bottle Service and the black shade is my go to Licorice.  Can I just quickly say that the formula on The More the Merrier is insanely perfect.  Smooth, opaque in 2 coats and so bright and summer-ific (yes it's a word...it is...you can trust me). I will most definitely be using this hot little lady a LOT this season!!

For the polka dot nails, I used a small dotting tool and just went to town. (excuse me, Dot used a small dotting tool and went to town).  Such a diva, I swear!

For the middle finger, I painted the entire nail black and topped it with Seche Vite.  After about 10 minutes, I put 1 piece of striping tape down the center of my nail diagonally and added 1 coat of The More the Merrier to the top half of my nail.  I immediately removed the striping tape, topped with more Seche Vite and Voila!

Ms. Pinky (get it Ms. Pinky like Ms. Piggy, not funny...sheesh... tough crowd) is probably my favorite nail of the bunch.  After I put down a base of The More the Merrier and Seche Vite, I added striping tape in diagonal stripes, added a decent coat of Licorice and removed the tape.  Seche Vite topped everything off as usual!

I am so into summer nails!  I am dreading summer just flying by and before you know it, I will be doing Christmas nails.  I am going to enjoy every mama slapping second of neons, bright pinks and yes watermelon nails!

Oh and if you haven't slapped someone around you yet....what the flip are you waiting for?  Get to beating and make mama proud!  (just don't come after me with that fist). Dang heathens!

Happy Polishing and Happy Watermelon-ing (again, it's a word, geez did you guys go to school?) ;)


Friday, July 5, 2013

Elle Polish and a Mish Mash of Nail Art!

Hi kittens, hope you're all having a fantabulous day!  I'm getting ready to film a haul video (with a little surprise ending) and clean my house.  Very very exciting I know!  The life of a beauty blogger/Youtuber....

So I got a few new polishes at Kohl's the other day.  They recently started carrying the Elle line of polishes and I must say, I am highly impressed!  I have about 6 of them and the formula on them all is quite amazing, not to mention some really beautiful color selections!

I knew I wanted to try this cornflower blue beauty as soon as I got her home....of course I had to add some Essie and a bit of nail art for you little nail freaks....


Ah yes, a typical mama smacker!  This turned out WAAAY better than I had pictured it in my head!  

I used Elle Ship Shape, Essie Off the Shoulder, a bit of Essie Blanc and INM Northern Lights

My middle finger is definitely my favorite of the bunch!  And it was quite easy to do....I used a base of Off the Shoulder, then put down some striping tape in rows, and topped it with 1 coat of Ship Shape.  

My ring finger is a "cloud mani" and on my thumb we have some simple dots that I did with a medium sized dotting tool.  Everything got a good coating of Seche Vite, which I'm sure you all know I would sell my first born for!  Tutorials for all of these looks are on my YouTube page if anyone is interested!

Have you guys tried any of these Elle polishes?  They can be found at Kohl's and let me tell you what....they are certainly worth taking a look at!  They wear great with very little chipping, even after a few days!  And there are some really gorgeous colors to choose from!

Happy mama smacking, I mean polishing, my loves!!


Friday, June 28, 2013

Time for a Splatter Mani...and an Old Favorite!

Hi chipmunks, hope you're all feel young, wild and polished tonight....oh LAWWWD Nicole, that is super cheesy even for you! (Sorry that was just Dot telling me off yet again)

I was feeling like a splatter mani last night...it's been a hot minute since I did one.  So I got out my overall's and got down to bidness. (yes overall's are necessary for nail art, no judgement please)


Did you slap your mama yet?  If not, then may I ask why the flip not?  Splatter mani's always get me....they are so super simple to do and they look so fun and on trend especially for summer!

I used all Essie polishes for this design, are you really surprised?  I just can't stop with the Essie's, I hope you guys aren't sick of it yet, because I am nowhere close to being done with this obsession!

It's pretty bad when you have to photograph the bottles just because you love them so.  These little square of perfection just melt my cold little heart.

For the splatter, I put down a white base with Blanc then splattered with the remaining colors....Sunday Funday (which I also used on my ring finger), The More the Merrier, Bikini So Teeny (also on my index and pinky), and Licorice.  I also used Licorice on my thumb and slapped a few dots on with the 3 "brights".

The formula on all of these beauties is amazing.  I know sometimes Essie polishes can be a pain in the bootay but not these ladies.  Opaque in 2 coats and just totally (I'm resisting the urge to use the word totes, you can thank me later) perfect!  If you haven't tried Licorice then you are missing out!  Easily one of the best black polishes I have ever used!  And Bikini So Teeny is a serious classic!  I use this a LOT and never get tired of it!  Gorgeous baby blue color, shimmer and a pretty lovely formula....someone get behind me, cause I'm about to pass the french out.

Is it normal to get so excited about polish?  Is anyone else this crazy?  Or am I on a polish filled island all by my lonesome?  (I have a feeling I'd have some company, yes I'm looking at you, you little nail hooch).

If you guys are looking for a splatter tutorial, I have a full one on my YouTube Channel, I'll link it below just in case.  *enter shameless plug from stage left*

http://www.youtube.com/watch?v=ReVr4ve8S9E

Hope you loves enjoyed!

Happy Polishing my friends!!

Wednesday, June 26, 2013

Flower Nail Art and My New Favorite Pink Polish!

Hi my loves...what a crappy day I am having.  Ever have one of those days where nothing seems to go right? Well, that's today for me!  Just got done fighting with the insurance company.  I do feel a bit better after telling some really intelligent gentleman off (can you smell the sarcasm) and calling him a turd face.  Yep, first thing that came to my mind....turd face...what can I say, I'm super mature!

Anywhoo...I did some nail art last night and am very excited to share it with you all.  I am very pleased with how it turned out.  I realized that I hadn't done my trademark flowers in a hot minute so I got my self together and this is what I came up with....


Slap your mama and call her Fannie....first that came to mind, don't judge me people.

I loved this design so much I even did it on ma toes.  I won't show you a picture, trust me you will thank me.  My toes do NOT need to be front and center on anyone's computer!

I used a new polish for this little diddy....Elle Pink about It.  I picked it up from Kohl's and it may very well be my new favorite pink polish!  Formula is amaze balls.  It reminds me of Essie Boom Boom Room but *gasp* better.  It applied like buttah and the color is so opaque and beautiful! I used 2 coats for the pics above.

I also used Essie Licorice, Essie Blanc, and China Glaze Glistening Snow. My bottle of Glistening Snow (from the 2012 Holiday Joy Collection) is quite low which equals extreme sadness because this glitter is so good!  Full coverage and shimma shimma to beat the band!  I usually end up with visions of someone's mama being taken down by an enormous life size boxing glove every time I wear it!

If you're interested in the dots or the flowers, I have tutorials for both on my YouTube Channel.  Hopefully I will have updated one's up soon with my HD fanciness that I gots goin on right now (yo).

I hope you muffins are all having a fantabulous day! Crossing my fingers that my day gets better and I don't have to give anymore verbal beat downs to well deserving idiots.

Love you guys!!

Happy Polishing friendships!

Sunday, June 23, 2013

Essie Gradient and a side of Dot!

Hello kitty kats, summer is in full swing and I couldn't be happier!  The hotter the better for me!  When it gets all sticky and humid like this I just want to bust out the brights and get my summer on!

So I was feeling like a gradient which is rare for me.  They are quite easy to do but a pain in the arse to clean up!  But I sucked it up and got rollin on a look that I must say, turned out exactly how I planned!


Ooooh hide your mama's!

For this little peach, I used Essie Orange It's Obvious and Essie Watermelon.  These babies go together like peanut butter and (I don't think you're ready for this) jelly. 

The gradient looks like a sunset doesn't it?  I know sometimes people have issues with these gradients.  I am going to be doing a video tutorial on my Youtube channel so that you guys can actually see how I do it.

You basically put down a white base, pop on a fast dry top coat (hello Seche Vite) and dab the polishes on with a damp makeup sponge. (it's a little bit more than that but you get the idea!)  If you guys would like a picture tutorial on the blog, let me know and I can get one crack a lackin for you fine little nail lovers.

For my index and pinky fingers, I did, excuse me....DOT did her favorite Dotticure using both sides of a dotting tool. (one end is large, the other is baby baby).  Sheesh, she gets so touchy if I try to take credit for a few dots.  What a biznatch. (For those of you who don't know what the heezy I'm talking about...Dot is my alter ego and she is a huge skanky bitch)

 I do have a tutorial on this design on my youtube channel....I'm thinking of doing an updated one now that I have a big girl camera and HD jazz-ola.  Let me know what you guys think!

Sooooo....I hope you babes enjoyed!  I guess I should do something with myself today.  Does watching YouTube makeup tutorials count as doing housework?  I vote YES!!!

Hey maybe I can make Dot do some chores for me....

Happy Polishing my loves!!


Sunday, June 16, 2013

Nails Inc Porchester Square and Portobello...and Of Course Some Nail Art!

Hi muffins how are we all doing on this fine Sunday eve?  I had a busy day of super exciting yard work and husband wooing since it's Father's Day and all.  I let the hubs put up his feet and I played mom and dad for the day....let's just say I'm glad tomorrow is back to norman as my kids like to say.

My momma came up today with goodies for my honey and of course she brought lots of things for me too!  As soon as I saw the Sephora bag I knew I was in for a treat.  2 of the polishes she gave me were from Nails Inc (one of my favorite brands) and you all know I HAD to play with them immediately.

First up we have Porchester Square:


Ok, I'm officially in love!  The polish is to die for...formula is amazing and the color is so classy and mama smacking good!  I mean just look at the bottle...HELLO....need I say more?  I did 2 thin coats and no topcoat for my photo.  I absolutely love, um excuse me, lurve this color!  Nails Inc is a really great brand of polish!  Everything I have from them (I'm talking to you Baker St) I totally am obsessed with!

Next up is the lovely and talented Portobello:


Lovely color, not so lovely formula.  I had to bust out 4 coats to get this coverage.  I really love how it looks but sheesh, who has time for 4 coats?  Not this girl!  The color is pretty, but it's nothing spectacular or unique so sadly I think I'd pass on this one if I could go back in time.  I have many other coral polishes that are much more opaque and worth beating your mammy over.

You guys know I had to do some nail art with these new little additions to my life...and Dot was really being a pain so I let her take the wheel and give it a go!


I totally love this combo!

I used a dotting tool to achieve this look but you could use a bobby pin or anything you have at home that could make the rounded shape.  If you're curious as to how I get the dots nice and uniform check out my YouTube channel (youngwildandpolished) for my dotting tutorial. (shameless plug, don't judge me)

And last but not least....


Now this makes me want to beat a baby....is that wrong of me?  Good polish makes me violent for those of you new to the YWP train.  I wouldn't really beat the baby but I may give him or her a little smack when no one is looking.  Shoot me why don't ya.

For the dots, I used Essie Boom Boom Room, Essie The More the Merrier and Essie Play Date.  I love how subtle it is but still fun and playful.  This most def is gonna be my jam for the next day or 2.

Did we have fun today?  What do you guys think of these 2 beauties?  I still can't get over how gorg the bottle of Porchester Square is....why can't all polish bottles be this amazing?  Think of all the beat downs people would get!!

Until tomorrow my friends!

Happy Polishing baby dolls!!

Friday, June 14, 2013

Caution....Nail Art Overload

Hi loves, how are we all today?  I am TIRED!  I worked out in our yard pulling weeds and planting flowers all evening!  I keep waiting for the landscapers to show up but those mo fo's never seem to come.  *sigh*

So there I sat twiddling my thumbs and wondering what I could do with these funked up nails of mine.  I was really feeling like a good water marble but I was just too dang lazy to get it all going.  (There's always tomorrow right?).  And so the debate began.... A solid color?  Too plain.  A dotticure accent nail?  Too expected.  A sheer color and no nail art?  *gasp*  Too crazy for my brain to even contemplate. So I began on my path to nowhere and this is what happened....


No you're not suddenly high...this is just the craziness that is Young Wild and Polished.  I do really like it, don't get me wrong, it's just a bit cray...even for me.  It was quite simple to do and I really love these 3 colors together!

I used Sation Tardy Tart, Essie Blanc and Nars Back Room

 On my index and pinky I simply did a white base and then with a teeny tiny almost non existent brush (has anyone seen my bifocals?!), I made some zig zag designs using a Sally Hansen Nail Art Pen.  Sadly I think they have been discontinued, at least around me.  They make nail art so easy, although I find a few of them to be a bit sheer.  The black one is awesome and makes me want to get violent and shiz. 

On my middle finger I put down a base of Tardy Tart (mama smacking amazing b t dubs), and then I crisscrossed striping tape and did the ol fill in the blank method.  I know a lot of you are curious to see this done in a video and I hope to have a tutorial up this weekend, possibly on this very look.

My ring finger has a black base and a traditional Dot special.  You know Dot....she always has to be the center of attention.  That spotlight stealing hussie.

Time for mama to crack daddy over the head (I got some new nail polish and it's amazing....don't hate the player, hate the game baby).  

Keep your peepers peeled for a tutorial of sorts on the "diamond nail".  But for now me and my dandelion destroyers are headed to dreamland.

Happy Polishing my loves! 

Thursday, April 18, 2013

Black and White and Striping Tape All Over??

Hi muffins, yes I'm still alive...allow me to explain...I was off for a week from doing my nails! Now this wasn't by choice, trust me, I was dying!  (Not literally dying, but dying cause I wasn't able to play polish, you know what I mean).  I used a new nail polish remover and I had a really bad reaction to it.  The skin around my nails got really red and basically peeled off.  It was a hot ass painful mess!  So I didn't have a choice, I had to lay low for a while and heal these babies of mine.  I certainly learned my lesson!  Zoya Remove...you are my one and only, I will gladly pay $10 for you and never complain again about your overpriced ass.

But I'm back bitches and I'm ready to slap some mama's to make up for lost time!  Let's get crackin!

Ok, so I was really missing pretty much all of my nail art tools during my hiatus so I had to do something fun for my return.  I went for my striping tape and then discovered another dilemna...what color do I use??  I haven't bought polish in a while (gasp) and I'm really feeling kind of blah about my massive collection.  Wah wah wah, get over it woman!

Bottom line is I decided on black and white because I couldn't make up my sweet little mind....ladies and gentlemen, please feast your eyes on exhibit A...


I am quite happy with how this little peach turned out...I'm ready to slap somebody's daddy over this little number, I don't discriminate. I started off with no idea what I was doing.  I painted my whole hand white, (Julie G. White Orchid to be exact) slapped some Seche Vite on and thought to myself...now what?

A little striping tape and a medium sized dotter later, this is what I came up with. Oh and the black polish I used was Layla Ceramic Effect Pure Black

 For those of you not sure how to work the whole striping tape thing, I have a tutorial on my YouTube page (YoungWildandPolished) and I also have a few other blog posts that go into detail.  Basically you paint on your base color, add a quick dry topcoat, (I highly, HIGHLY suggest Seche Vite), wait about 10 minutes, add striping tape wherever you want, slap on a second color, immediately remove the striping tape and Voila!!

Once you're all finished up, all you have to do is topcoat and backhand the person closest to you....

(Please overlook the dry spots around a few of my fingers.  It's not dry cuticles, it's still from the dreaded polish remover that didn't know how to play nice.)

I've missed you all, and I'm so happy to be back.  I have lots of fun nail art posts coming up and a few makeup related ones also.  It's a whole new world for me to jump into the world of makeup and swatching blush and lipstick, but I think it will be fun.  If you guys decide you're not interested in the makeup stuff and want me to stick to nail art, that's fine also.  I'm here to please, my wish is your command, basically what I'm trying to say is...I'm your bitch, whatever you want, you shall get!

I hope you guys enjoyed this!  I feel like I've been away forever! 

Happy Polishing Loves!!

Tuesday, April 2, 2013

Warm Weather Nails....and a...beatdown?!

Hello kittens, 2 days in a row...wow I am on my game this week!  I am turning over a new leaf!  Blogging every morning before I start my day is going to be part of my new routine.  So far so good, 2 days in and I'm liking my new system!

So last night I did a super fun little mani that kind of just came about.  It was one of those "I have no idea what I want to do so I will decide as I go along" type mani's.  I really wanted to pair these 2 colors together and I'm so happy I did!


I used Loreal Royalty Reinvented (purple), and Loreal New Money (green).  Let me just say....I absolutely am in love with Loreal nail polish!  Aside from one or two that I have tried, their formula is so amazingly perfect.  The colors are super saturated and just flow on the nail so smoothly.  Both of these colors were super opaque and did great with 2 coats.  

I started off by painting my index and pinky finger with Royalty Reinvented.  I did my middle finger with New Money and I top coated them all with Seche Vite.  I did my ring finger with white but I didn't topcoat that just yet.  

Once the 3 fingers aside from my white ring finger (which we will get to in a minute) were dry, I taped off a few spots with striping tape, painted over that with the opposite color and removed the striping tape immediately.  I let that dry about 10 minutes and swiped on another coat of Seche Vite.  Then I slapped my mama just cause I could.  I thought about beating my husband over this happy little mani but I decided to let him slide...I'm nice like that.

On my ring finger, I just took both Loreal colors and put some different sized dots all around the nail.  And of course, I topped that baby off with Seche Vite once it was nice and dry.

I have tutorials for both of these designs on my YouTube Channel, which is the same name as this little diddy...Young Wild and Polished. Although I think it's more like YoungWildandPolished, no spaces kids.

What do you think?  I'm so flippin ready for spring!  Maybe if I keep doing these summery bright looks someone will take notice and flip the thermostat to warm?  I am so done with this cold ass weather.  My skin is dry, my cuticles fight me on a daily basis, not to mention I have soooo many cute little spring dresses that are just calling my name.  Come on, Mother Nature, warm this state up before I get to slappin ho's....I'm not above beating the piss out of a crabby old bat who loves to torture sweet girls like myself.  Mother Nature...you and me is about to get down.

And I digress....once again...

See you love muffins tomorrow!  

Happy Polishing Dolls!

Thursday, March 14, 2013

A Hottie Dottie!

Hi lovers, quickie today--work is busy and lovely as always. Getting screamed at by patients always brightens my week so much!!

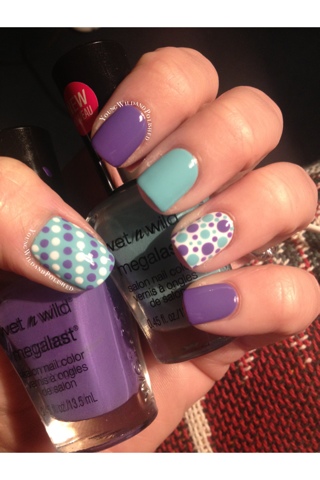
I did this mani last night and was quite surprised with how much I loved it. I pulled out 2 Wet n Wild colors that I've had forever and a day, On a Trip and I Need a Refresh-mint. I love both of these colors so much!! Amazing formula and pretty opaque colors that just don't quit!

Also the brush on these polishes is freaking perfection. I can almost get perfect coverage from cuticle to nail tip with one swipe of that big ol' brush!! I wish every major brand would take note and change their brushes! The design is total genius!

I added some dots, slapped a few mamas and called it a day! Don't judge me people-I can't control myself!

I'm posting a "before" video of my makeup stash and I'll post an "after" video this weekend. I'm getting lots of goodies from Ikea--Helmers and Alex units (yippee) so be sure to check my YouTube channel for that!

What do you guys think of the WnW polishes? Are you as obsessed as I am?? Have you slapped any mamas, papas or newborns over these hot lil numbers?!!

Happy Polishing My Friends!!!


Wednesday, February 20, 2013

A Lunchtime Quickie!

Hi loves, super quickie today...blogging quickly on my lunch break.

I did this mani last week, and those of you who follow me on Instagram already saw this little baby. But I wanted to share with my blog following bitches also!

I absolutely love the way this mani turned out. Of course I'm on my phone so I have to list the polishes before showing the pics. Stupid Blogger app!! Blah!

Nails Inc Leather Effect
Orly Red Flare
Julie G Black Sheep and Wild Orchid
Laquerlicious Stroke of Midnight

We have a little bit of everything going on here! I'm a kitchen sink whore, I totally admit it!

Happy Polishing dolls!