Showing posts with label Tape Mani. Show all posts

Sunday, December 30, 2012

Selena Gomez for NOPI....and a milestone!

I posted a few days ago from my phone not realizing that it was my 100th post!  That crappy little post I did doesn't deserve to be my big 100th so we are going to pretend it never happened and celebrate today.  (No comments from the peanut gallery)

I will be posting twice today, first with some of the new Selena Gomez for NOPI Collection and later with some favorites and resolutions!

Today we will take a look at 4 pretty little ladies....

Hit the Lights:


Ahhh, a bright saturated yellow, sign me up!  Of course this one was a little finicky, it's yellow after all.  But overall it was pretty darn good.  There was a little pulling and streaking but that is to be expected.  3 careful coats and we were all good!  I love this color with my skin tone!  I have to be careful of yellow with my olive complexion but this is definitely one I will be grabbing come summer time!  This little beauty also will be great for nail art!  I can easily say I don't have another color like this in my enormous collection, and that is saying something!
 
Above pics are 3 coats, no topcoat. 


Pretty in Plum:


Ok, before I say anything, let me just get this out in the open....this gorgeous sexy mama is a 1 coater, yes a 1 coater.  I used 2 but I really didn't need to and now I wish I wouldn't have.  I was just so enamored with this color, and the formula was so perfect that I wanted to keep playing with it.
 
I'm a sucker for a deep sexy plum color like this.  I love the way it looks with my skin tone and I love how easily this polish applied.  Definitely a favorite of this collection!
 
2 thin coats no topcoat.  As I said, you could easily get away with 1 coat.


Love Song:


Love song is a creamy easy purple that went on like buttah baby!  I was disappointed at the lack of shimmer once the polish is on the nail.  What is seen in the bottle definitely does not translate to the nail.  This one reminded me of a mix between Essie Play Date and Sation Tardy Tart. 
 
I'm not jumping for joy over this one, just your basic pretty purple polish.  Above pics are 2 coats, no topcoat.


Selena:


Finally, we have a mama slapper.  After I slapped my mammy into next week, I did a backflip and stuck the mother lovin landing!  I LOVE THIS COLOR!!  The formula on this one was really good, there was a tiny bit of pulling but nothing that I couldn't fix with a 3rd coat.  Creamy, saturated, bright, yes, yes, where do I sign up for more of these babies??
 
 
Easily my favorite of the bunch.  3 coats, no topcoat.
 
 
I was so thrilled with Selena that I couldn't bear to take her off without first doing a little nail art.  After all this swatching, I was dying to pull out some tape, a dotter, anything, please just let me do some nail art!!!


Isn't this just adorable?  I was pleasantly surprised how well this turned out. 
 
After topcoating Selena with Seche Vite, I added a little striping tape.  Love Song was my choice for 2nd polish and she served me well.  I was a little worried how well she would cover, but I had absolutely no issues.
 
And yes, I did slap a mama after this one....my mother was already laid up from the Selena incident so I just picked a random to abuse.  I feel much better now!
 
 
There you have it kids, the beginning and probably my favorites of this collection.  I will have the rest for you in the coming days, along with the new Modern Family Collection and the Mariah Carey for OPI Line.  Wow, the polish Gods have been busy lately!
 
I'm pretty darn proud of myself for making it to 100 posts!  In my extremely busy life, finding the time to blog shows me just how much I love doing it and just how much it means to me.  It may just be nail polish to some, but this whole experience has been so much more for me.  I have said it before but I am in such an elite class of women and I am so happy to be sharing this ride with them all!
 
Watch for my Top 20 polishes of 2012 coming up later!


Friday, December 21, 2012

Everything But the Kitchen Sink....times 2

Ok, before we do anything, I have to get this off my chest.  People suck!  I had 2 really bad encounters today with assholes.  One at work over the phone, which I won't get into too much because I try to keep work off of this blog.  But a patient was super rude from the second I answered the phone.  Then I am at CVS wrestling through the crowd, soaked in sweat as if I just ran a marathon.  (Ok, it wasn't quite that bad but let's pretend).  There's a guy in the aisle and he needs to get by me.  Instead of saying excuse me, he literally knocks me over to get by me, looking me in the eye as he does it.  Now this could have resulted in this man in a headlock with me yelling obscenities at him but I let it slide. Isn't it the Christmas season?  Aren't people supposed to respect and treat people with some level of kindness?  This world is a sad sad place.  I cannot be held responsible if I flip the script and go HAM on these bitches.  (First time using the phrase HAM aka hard as a mother flucker, I feel so Bad Girls Club tough right now!!)

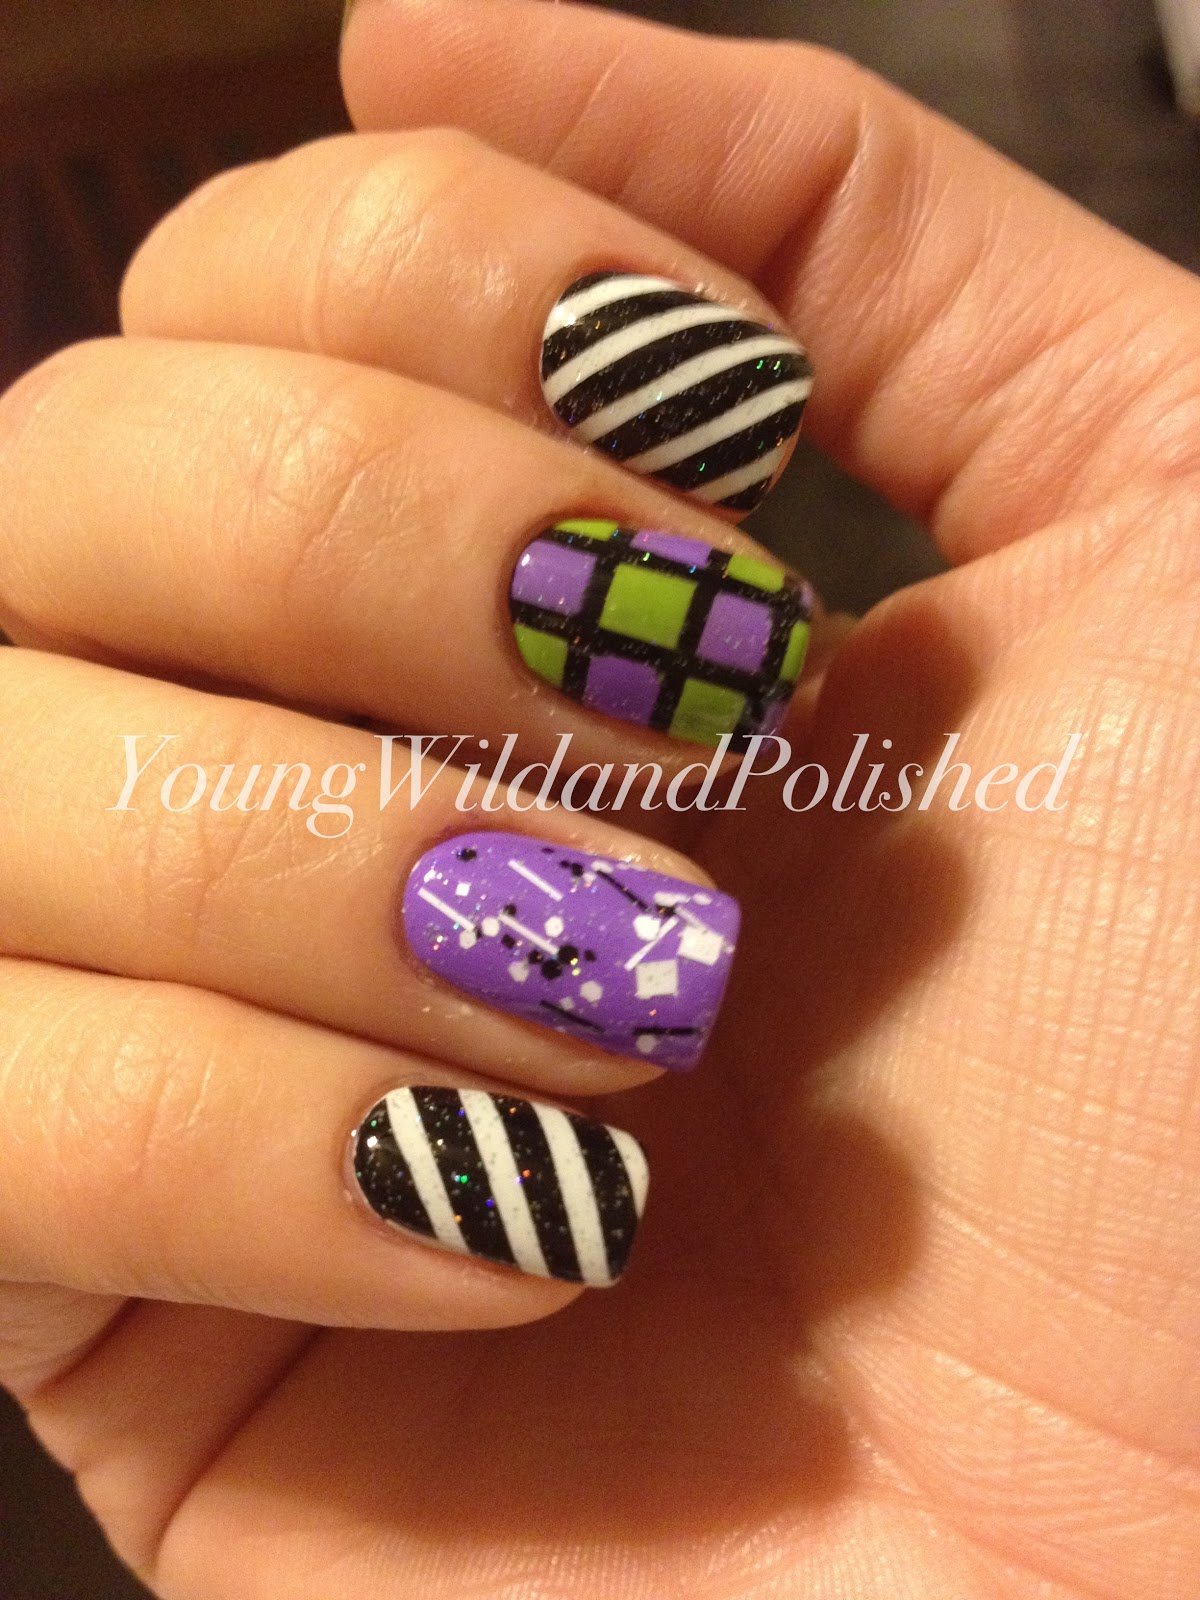
Ok enough incessant babbling, on to the nails.... The mani I am sharing today is super fun and I am very very proud of it.  I must say I have gotten quite good with striping tape and I love it to the ends of the earth.  Have a lookie loo and then we'll talk shop. ( I'm not posting from my phone so this will actually be a big girl post with pictures in the middle)


I even managed to do my left hand!!


Pretty bad ass huh?  I am really a fan of the black and white accent nails with the checkerboard pattern! 
 
I used Layla Ceramic Effect Pure Black and OPI My Boyfriend Scales Walls for the stripey nails.  These 2 babies have become my go to's for all things black and white. 
 
 I used Sation Tardy Tart for the ring finger accent and part of the checkerboard pattern.  I am such a huge fan of Sation brand polish!! Every single one I own I just adore.  Formula is amazing as are the colors!  I know I've used this one many times before but I just can't stop!
 
 The greenish color I used in the checkerboard is China Glaze Def Defying from their new Cirque line.  It's a very fun neon cream with a really good formula! 
 
 The glitter on my ring finger (and my shy thumb) is Lush Lacquer Salt and Peppa, the worlds best black and white glitter.  It is full of different shapes of, you guessed it, black and white glitter.  What seperates it from all the other black and white glitters of the world is the shimmer. Just enough to be noticeable but not too much to be annoying.  Everyone should own this!  It is so versatile and fun!
 
I put a layer of INM Northern Lights over the entire mani.  I have a slight problem with this glitter topper lately.  I CAN'T STOP USING IT!!!  I think I may need someone to take me to a Glitter Anonymous meeting.  I know there are a bunch of you out there that I should pick up along the way!
 
 
I also did a similar mani a few weeks ago and without realizing it, I made it appropriate for the holiday season. 


Just looking at this picture makes me want to slap my mom into next week!!
 
 I love this mani so much!  I know I shouldn't toot my own horn, but I can't help it.  *10 piece band enters room* 
 
My index and pinky fingers are exactly the same as the above mani.
 
Middle finger is done with the splatter method.  I painted the nail white and then splattered OPI What's with the Cattitude, China Glaze Def Defying and Layla Ceramic Effect Pure Black onto the nail using a little coffee stirrer straw.  It's super simple!  All you do is dip the straw about a half inch right into the polish bottle and blow onto nail.  You have to blow hard and fast (dirty minded pervs keep your brain on polish)  or you will just get a big blob of polish on the nail.  I always tape around my cuticle before doing this because it does get messy!
 
Ring Finger is Essie She's Pampered with a coat of Lush Lacquer Salt and Peppa.  This mani is basically the exact same as the above one with a few tweaks here and there.
 
Northern Lights again topped it off all along with a nice thick coat of Seche Vite. 
 
I really am loving this "everything but the kitchen sink" mani that I've been doing lately.  What do you guys think?  Is it a momma smacker or do I need smacked for being obsessed with this mani style?
 
Happy Polishing Love Bugs!!


Saturday, November 24, 2012

Zoya Aurora and Storm are the Best of Friends!

As I type this I am hoping everyone survived Black Friday.  I heard a few reports of people getting beaten and trampled and I had to stop and wonder where a few of my friends were at.  I'm not above beating someone over a bottle of nail polish so I'm totes not judging.  I just find it comical that we celebrate being thankful for what we have, then we turn around and crowbar someone for a $5 toaster.  The good ol USA!!

But on to more important things....Zoya Aurora and Zoya Storm!!


Sorry the lighting made me look like an oompa loompa...but captured the polish just right, go figure!


Here are a few of my right hand...I'm trying to get her used to being in front of the camera, she is quite shy!


I love these 2 colors together so much!!!  I certainly will be inviting my mother over for a smacking session!  And this wasn't nearly as hard as it looks.  All you need is striping tape and a little patience.  I did different designs but tried to keep it somewhat uniform by matching up 2 fingers here, 2 fingers there. 
 
For those of you not "down" with striping tape, here's a brief rundown of what I did....
 
First I put on 2 coats of Aurora and topped that with a coat of Seche Vite.  You can use any fast drying top coat.  I love love love me some Seche, I never use anything else.  Here are a few shots of Aurora all by herself like a big girl!


Every time I wear Aurora I am amazed at her beauty!  She is probably, well definitely in my top 5 most sparkly, glitterly, gorgeous, easy to work with polishes.  ( I just made this category up, don't sass me people). 
 
Ok, back to the steps...Once this was dry, after about 10 minutes, I taped off my nails with my striping tape, doing one nail at a time.  Once you have your tape pressed down nice and close, especially at the cuticle area, put on a fairly thick coat of your second color, in my case Zoya Storm.  As soon as you are done applying Storm, carefully remove your tape. ( I use cuticle nippers to do this to keep my hands clean).  Repeat this for all your nails, doing only one at a time, and removing the tape as soon as you are done applying that second color.  If you wait until your second color dries, you will have really crappy looking lines, and possibly will pull half of the polish off.  We don't want to do that!
 
Wait at least 10 minutes before top coating!  If you don't you will smudge your hard work, and hell hath no fury like a smudged mani!! Put on a nice coat of Seche or your favorite topcoat and you are all done!!


Not so bad right?  If you guys decide to do this please tag me in your pics!  This is a really fun way to use these 2 beauties together!  And they certainly play well with each other!  I was really pleased with the end result!  I received so many compliments on these yesterday at work and at the store.  I swear I had to dodge a few public smackings from total strangers.  The nerve of people I tell ya!!
 
Have a good weekend kiddos, and as always, Happy Polishing!!


Tuesday, October 30, 2012

A Striping Tutorial (Of Sorts) and a Side of Water Marble!

Hi loves, I feel like it's been forever since I've blogged even though it's only been a few days.  We have been fighting Hurricane Sandy for the past few days.  It got pretty scary for a while.  We didn't lose power like many people but we were without internet *gasp* for 2 days.  You would have thought my kids had been told their favorite puppy had been beaten.  They were totally lost and didn't know what to do with themselves.

We are very grateful we didn't have more damage and of course many prayers and thoughts to the people who are facing much devastation due to this pain in the ass of a storm.

Ok now the fun stuff...so over the weekend, my order from Born Pretty Store finally, FINALLY arrived.  I had been waiting for a very long 2 months!  I guess that's what happens when you order from Hong Kong.  Way to go Nicole!  In my order was a little roll of heaven, also know as striping tape.  For those of you who are not familiar, don't fret, I will let you know exactly what the dilly is after these pics...


Oh, thank you so much super large out of place picture for showing up yet again!
 
I'm playing around with watermarks, I promise I will find one soon and stick with it.  
 
Let's talk colors first and then I'll get into the designs.  I marbled and striped with the same colors, Essie Butler Please and Where's My Chauffeur. Well, I kind of striped with the same colors, more on that in a minute!  These colors go together just lovely don't they?  I really am loving Where's My Chauffeur the more I use it but I am still at odds with Butler Please.  I don't think we will ever see eye to eye. 
 
 
The middle 2 fingers are just my regular old water marble.  If you're just tuning in, and you're not sure of how this is done, I have a tab on my home page with a very detailed tutorial.  I have heard it is very helpful so be sure to check it out.  The index and pinky fingers were done with striping tape. Let me just tell you, I am all in with the tape thing!  It is a little tricky to get clean lines but it certainly can be done.  I'll give you a quick run down of how I did mine, hopefully it will help those of you not familiar with this method of nail art.
 
 
First I painted both nails with Where's My Chauffeur (turquoise).  I did 2 thin coats and then a coat of Seche Vite.  Any fast dry top coat will do just fine, I just happen to be a SV junkie and never use anything else.  If I were deserted on an island you can bet your sweet ass I would have a bottle of Seche in my cute little "stranded on a desert island" nail tote.
 
  And I digress....so let that dry for about 10 minutes and then it's time to play.  Cut a small piece of tape off of the roll.  Make sure to bend the edge of the tape back that is left on the roll or you will be spinning the tape and searching for the start spot for 20 minutes like I did.  Place it on the nail making sure to lay it flat the WHOLE WAY down to the cuticle or the side of the nail.  If you just press it across you will have a gap and your line will come out uneven. I used a toothpick to push the tape down flush with my nail at the cuticle edge.  This is a very important step, don't skip over this one kids!
 
 Repeat this until you have all your pieces on.  Then it's time to put on the second color.  I attempted to use Butler Please but the formula was just so awful that I had to grab my trusty Sally Hansen Pacific Blue.  Since the 2 colors are so similar there was no issue.  And it was the right choice!!  PB worked so well!! 
 
You want to make sure that your second color is very opaque, a 1 coater is really the best thing for this.  Put a decent coat on top of the entire nail covering the base color and your striping tape. You don't want it too thick, but it can't be too thin or you won't get good coverage. (That's not confusing right?)  As soon as you have the nail covered, remove the tape strips one by one being very careful.  It is very easy to destroy the design at this stage.
 
I used cuticle nippers to pull my strips off, and I pulled at a little bit of an angle.  I don't know if it made a difference, but as you can see, my lines came out pretty darn clean! 
 
Do NOT let the polish dry before removing the strips!!  Make sure that you take them off as SOON AS you are done putting your second polish on. 
 
After you have all of your tape removed, allow the polish to dry. Very carefully and very gently put your topcoat on.  I used a very gently hand making sure I didn't smudge my design.  The dreaded smudge is enough to make you commit yourself to a mental institute.  You spend all that time perfecting your nail art, and with one swipe of that effing topcoat, all your hopes and dreams are down the toilet.  (Yes hopes and dreams, I'm committed ok?)
 
That's all there is to it.  It does take a little practice.  This is by no means the greatest way in the world to do this, but it's my way and I think it works really well.  I hope it helps those of you that are a little scared of trying this.  Yes, that little roll of tape can be intimidating but it's really not so bad! 
 
Make sure to send me pics if you guys do try a tape mani!  I'm on Instagram with the same user name, Young Wild and Polished and Twitter under YngWildandPolshed.  I hope to get lots of pictures!!!
 
 
Happy Polishing and Super Happy Striping!!